Page 3 of 5
Posted: Thu Aug 25, 2011 10:13 am
by Lex
I am working on a Character Wizard of sorts.... largely inspired by a morph-dials video done by Funksmaname. Now, I don't know how to use the morph-dials yet... I'm a newbie and not really good at rigging either but I believe it's possible to create a 360 degree viewable character without having to use multiple character switch layers.
Currently, I'm working on my base template characters. So far, based off of those wooden posing dummies and Da Vinci's vetruvian man, I have developed templates for a man and woman. I intend to include templates for adolescent male, adolescent female, and young child. It'll take awhile... I'm not extremely artistic. Here's what I've modeled so far:

The templates are not yet rigged. And switch layers are used for clothing, though the wardrobe is a little light at the moment. My first experiment with them, upon learning how to work morph dials, will be the 360 degree turn. If this is successful, I plan to set up a body type morph template to ranging from starved to obese. After that, a head shape morph template that will include both macro (overall head and jaw shapes) and micro (eye, brow, nose, lips, and mouth shapes) details.
Assuming those experiments bear fruit... well, I'll just say the gears are really turning (but that doesn't necessarily mean the machine's working right). I'll try to keep you posted on my progress. The possibilities are very exciting... and if it works... I'm thinking.... Character Sorcerer?
Posted: Thu Aug 25, 2011 11:47 am
by neeters_guy
Looks good so far!

Once you're close to a roll out, you might consider starting new thread. Character Sorcerer is good, but something simpler perhaps, maybe Character Maker or Character Generator?

There is a nifty Flash character maker on newgrounds. You can't change proportions and views like in CW, but you can get a fairly wide variations just by changing features and clothing and such:
Anime Character Maker 2
Anyhoo, this is a bit off topic, but it may inspire you.
Posted: Thu Aug 25, 2011 12:51 pm
by funksmaname
Good luck with that Lex, my only advice at this point is don't complicate your life doing multiple characters until you've really nailed how doing one works - you're going to create yourself a lot of frustration having to correct multiple character over and over until you find the right recipe...
...I'm interested in this project, keep us posted, as I've not worked out how to do a 360 turn with MDs yet - GOOD LUCK!
Posted: Fri Aug 26, 2011 3:25 pm
by Lex
...I'm interested in this project, keep us posted, as I've not worked out how to do a 360 turn with MDs yet - GOOD LUCK!
Given you are quite a bit more practiced than I, you may actually be able to test the idea much more quickly. The idea I have that might make the 360 possible is creating a kind of morph switch using two control bones. I'll try to illustrate the basic idea.

The numbered bones represent body positions:
1. Front
2. 3/4 Front
3. Side
4. 3/4 Back
5. Back
Naturally, the body can turn to the right or the left, hence the need for two 3/4 front, side, and 3/4 back positions. Naturally there is only one front view, but (and hopefully here is the trick to this) there are two back positions plotted when, like the front, there is only one back view. There are two backs because this is where the morph switch is.
Notice there are bones inside the circle, much like the hands of a clock, only here, they are directly opposed to each other. Almost mirrored, if you will. They are each parent to the control bones that are also directly opposed to each other on the circle.
Normally, only one bone will be active (in the active area of the circle). The exception to this is when both control bones are actively showing the back view.
In theory, since, like the front, there is really just one back view, we should be able to effectively create a 360 degree turn by switching the active control bones.
I hope this makes sense. Even more so, I hope it works.
Posted: Sun Aug 28, 2011 12:44 pm
by funksmaname
hey, thanks for posting. I think the bigger problem with the setup will be controlling the shapes - the fact that front and back views must be made of the same shapes, particularly if you plan to use smooth interpolation on the turns instead of hard switching... you can't have bits 'off screen' as they will float in and out of shot during transitions, so you'd have to plan and construct the character carefully enough so you can create the illusion of a 360 turn with the available shapes.
The other problem i've had with experimenting with turns is that the shapes that come in and out of view's visibility need to be 'fanned out' towards the end of the action, which doesn't suit single frame actions much.
I've just had a though which I'll talk to Rudiger about a new type of bone that 'retriggers' a multiple point animation when it gets to 100% so it can be reusable. The problem with multipoint actions is that they are synced to the timeline, and if you have them cycling and 'mix them in' they still have to line up with what they are trying to do...
again, my advice is start with something really simple until you've proved to yourself its possible. Do a successful 360 head turn using this method on a single, simple character, and then build it in complexity, grow it to include more body parts, and only then think about making multiple characters (once you cracked the construction of the 360 character, you can probably use a similar method to what I found in my custom CW video to be able to adapt them to whatever shape you want - and pre-rigged)
good luck
i will also think about this...
Posted: Sat Sep 03, 2011 6:00 pm
by jonbo
Here's my latest LOTR character. I re-worked him after some advice from the forum. This one's the gollum character and I'm kind of happy how he turned out. Any suggestions for the next one? I'm thinking either an orc or Nazgul. Here's the link for the file. The file includes the mods, preset, front view WIP anime file and these two views.
http://www.mediafire.com/?t5a76n5c12dpn83
Exported views:
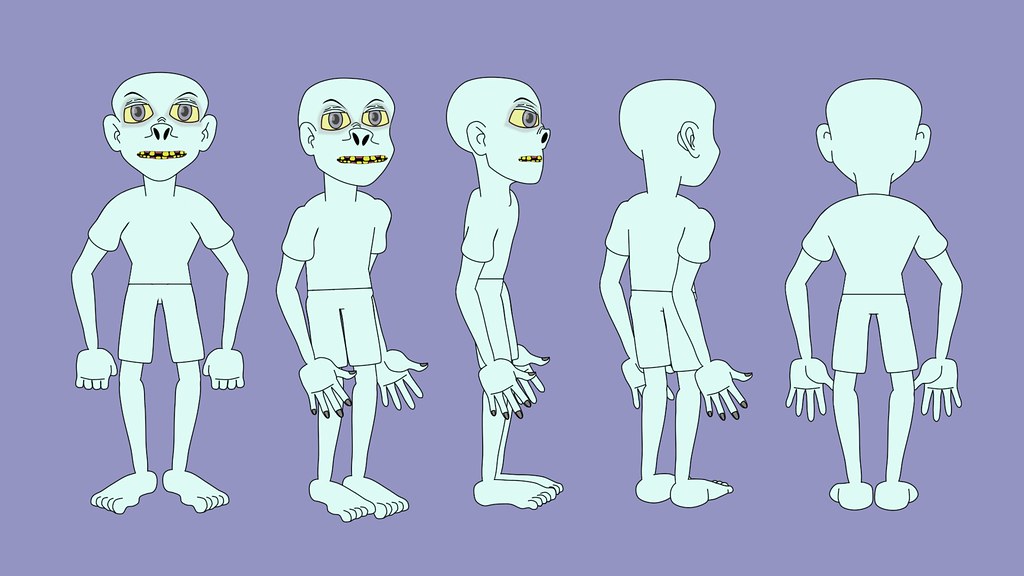 smeagol views
 by
jonbo64, on Flickr
WIP:
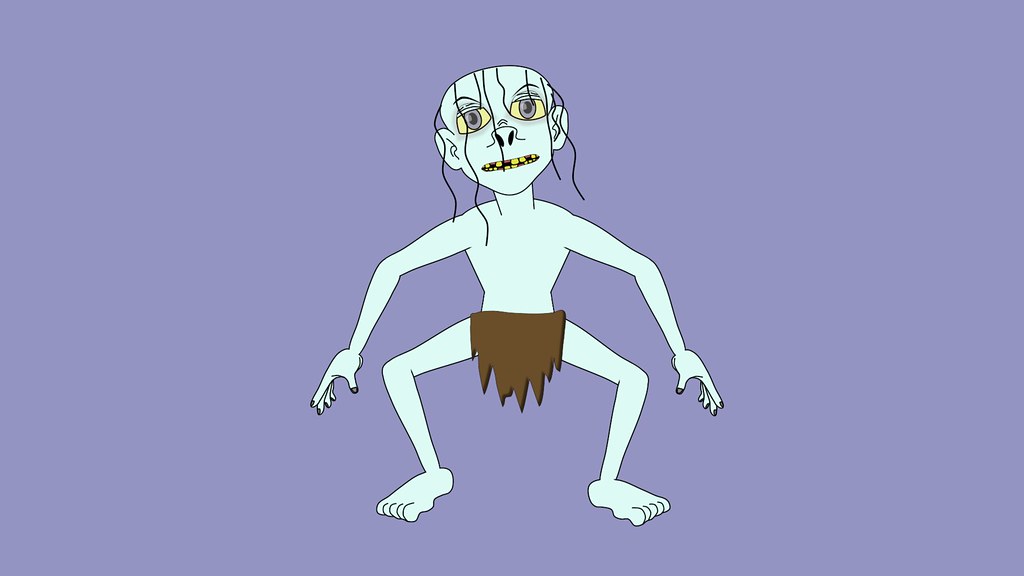 smeagoltweak
 by
jonbo64, on Flickr
Excellent
Posted: Sun Sep 04, 2011 12:52 pm
by penningtons5
Am Enjoying your work to improve the Character Wizard. Had a couple Ideas I thought would make it nicer for those of us involved:
I think to avoid overlap of part names which will not only confuse us when we discuss them, but make it easier to add them to our wizards. We should add a prefix to the parts Think perhaps our 3 initials . This will do a couple of things.It will sort the parts in the list by the maker, and if we get two people who make bald heads or anything we will know which is which.
I also like the neeters_guy work on the dude parts. He zipped his files in the main wizard folder with correct subfolders all I needed to do was drop this onto the wizard folder and it did all the sorting.
If this and name prefix were used there would be little chance of overwriting a file I want to keep. And of course I would recommend that all users backup the wizard folder with a name like wizard backup and be ready in case you do lose a character you wanted to keep. This way it will only take one folder to restore in the event your or a new part does something you find unfavorable.
Last thought more of a question but I think it belongs here Since it would be a wizard mod if we can do it. Is there a way to trigger the head prop option in the code so we could add props to all characters Would have been nice to see about three prop options and a left right slider to go with the controls. Then we could make things like watches or badges or even hair for the bald models.
Thanks Guys plan to add some work in here soon.
JRP
Posted: Sun Sep 04, 2011 1:05 pm
by GCharb
Hey, what about Smeagal?
Posted: Sun Sep 04, 2011 1:37 pm
by jonbo
Hey penningtons5, I will keep your suggestions in mind for future mods I post. Neeters is a much more organized person than me and since we've received virtually no feedback, it didn't occur to me to also organize my mods as such. To answer you question, no, there isn't a way to activate the head prop slider for any character other than the creature as the prop completely replaces the head in the creature character. Yes, it would be nice to replace hair styles, beards, hats, etc. easily and maybe Mike C. will implement this in the future. Please post your mods, I'd love to see them.
Edit: gilles, I'm not finished with her yet, she's pretty high maintenance
Self correction
Posted: Sun Sep 04, 2011 3:04 pm
by penningtons5
Smeagle is an awesome Character! I missed him due to reasons below thanks for Sharing!
In my last comment I had posted after only seeing 1 page of this conversation. I mistakenly thought I was at the end. I now see others had already Followed Neeters style of zip enclosure.
I have experimented with the head files in some of my own work to add props to the character that would be tied to the head and it does work however seemed to be to much work when I can easily add a single item to my Characters.
When I edit my Characters after I use the wizard is it normal for parts like the torso to appear only as outlines??
Posted: Sun Sep 04, 2011 3:15 pm
by jonbo
What I think you're seeing is because you're exporting all the views, these are placed in a master switch layer. If you right click on this switch layer and choose the view you're working on, it should give you all of the detail you need. BTW on page two of this thread, I've got two other character mods and some part mods and neeters has two character mod as well. I don't know if you've seen those yet.
Outline
Posted: Sun Sep 04, 2011 3:45 pm
by penningtons5

It does only happen with all views
Tried it as you explain this is what I see
A is view after selecting the back switch
B is after I select the torso as an example
C is an adjustment made in this view
D shows without seeing other parts I have to go back and forth since I can not see the result in relation to rest of model
Sorry if I am missing something thanks for the help....
Posted: Sun Sep 04, 2011 3:58 pm
by jonbo
From that screen shot, you haven't switched views like I said. RIGHT click on the top layer that says woman, and choose the view you want from the pop-up menu. Or you can drag the view you want to work on to the top most spot of the layer palette which takes this view out of the master switch layer. I do this when I want to work on views side by side to match them.
Thank You
Posted: Sun Sep 04, 2011 4:12 pm
by penningtons5
Thanks Jonbo
Your parience was appreciated!
So nice that you caught that. It does work Now I will work more with the CW and hopefully this week I will share a new Idea with all in here!
JRP
Posted: Sun Sep 04, 2011 4:14 pm
by jonbo
You're welcome, that's what we are here for. Looking forward to seeing your work