Anti-Aliasing Artifacts (layer seams)

General Moho topics.

Moderators: Víctor Paredes, Belgarath, slowtiger

User avatar
lazerslab
Posts: 35
Joined: Sat Mar 26, 2022 12:55 am
Location: Cranston, RI
Contact:

Anti-Aliasing Artifacts (layer seams)

Post by lazerslab »

Hey everyone! I'm relatively new to MOHO (picked it up about 7 or 8 months ago) and I LOVE the software and the forums. For the most part I have got the hang of things, but I have a few (minor) issues that persist and since I can't seem to find any info on it, I thought I would take to the forum...
I occasionally experience issues with a 'haze' or 'seam' on the edge of layers that have the 'hide edges' feature enabled. Here's what I mean:
Image
Basically, when rendering with anti-aliasing enabled, edges of layers that have hidden edges create a line where the edge would normally be. When I shut off anti-aliasing, these artifacts disappear, but ALL the visible lines become janky. Obviously, neither of these options are ideal, So I was wondering if anyone else experienced this, and if so, are there any workarounds?
It's a pretty minor issue, but I am going to great lengths with rigging to create a somewhat 'cel animated' look, and these lines really screw that up. They don't seem to appear when the shapes all exist on the same layer, but unfortunately, I need the seperate layers for animating layer order for certain smart bone actions.
Even if there is no workaround, I am really interested in understanding the cause of this issue. I come from an Adobe Suite background so some of the functions of MOHO surprise me (most often in a good way) and I love to know how this stuff works to help in my rigging process!
Daxel
Posts: 1088
Joined: Wed Mar 27, 2019 8:34 pm

Re: Anti-Aliasing Artifacts (layer seams)

Post by Daxel »

This usually happens when you cut a drawing into different shapes to put each shape in a different layer. Those shapes share the exact position of the vector points that separate a shape and the other, and that seem to confuse the antialiasing. I would just manually close the visual gap by moving the adjacent vector points of a shape over the other, just a tiny bit.

I made some tests to understand it better: for this to happen you only need two shapes close to each other that share the position of the adjacent points, with no outline. It's not necessary to have them on different layers or to have used the hide edge tool specifically.
User avatar
lazerslab
Posts: 35
Joined: Sat Mar 26, 2022 12:55 am
Location: Cranston, RI
Contact:

Re: Anti-Aliasing Artifacts (layer seams)

Post by lazerslab »

Thanks for the replay Daxel! In the case of the knees shown above, I could definetely see that being relevant, however, this edge also appears on the hip, where I have greatly overlapped the shape (the hip shape is rounded, where the leg overlaps it quite a bit, and the edges are still clearly there) Anyway, for me unfortunately, the extra overlap has never had an effect on that edge. I should note that these characters are very large - the project composition size is appx. 5000px wide- which seems to increase the likelihood of getting the artifacts.
Daxel
Posts: 1088
Joined: Wed Mar 27, 2019 8:34 pm

Re: Anti-Aliasing Artifacts (layer seams)

Post by Daxel »

lazerslab wrote: Fri Jun 10, 2022 3:26 pm Anyway, for me unfortunately, the extra overlap has never had an effect on that edge.
Oh I don't know what could be causing that. Maybe someone will tell us.

I've seen this problem with some masking techniques. In those cases, the expand mask by one pixel (or something like that) helped. On the layer settings.

If you provide a file link (using any cloud storage service), we could take a look at it. Sometimes it's key to solve the problem.
User avatar
Hoptoad
Posts: 718
Joined: Sun Jan 03, 2016 4:19 pm
Location: Florida

Re: Anti-Aliasing Artifacts (layer seams)

Post by Hoptoad »

This problem is fixable. I had it happen before on a character's face, and I fixed it.

I think the "ghostly line" was caused by was a bad shape. Possibly involving a mask and the usage of styles?

Possibly I had accidentally copy/pasted an identical shape over a shape within the same layer, and changed the color of the upper shape, and what I saw was a "ghost" of the lower layer's stroke? I'm not positive how I created the problem, but it was my fault. Oops.

Anyhow...

I suggest that you delete the bad shapes. Not just the fill. Delete the points also.
Then recreate the shapes without using a style.

That's how I fixed it.
User avatar
synthsin75
Posts: 10280
Joined: Mon Jan 14, 2008 11:20 pm
Location: Oklahoma
Contact:

Re: Anti-Aliasing Artifacts (layer seams)

Post by synthsin75 »

Looks like you have a shape under those shapes. When Moho renders, stacked shapes have their anti-aliasing composited and then the next shape is composited against that result...in effect pushing the underlying shape's anti-aliasing out to where it becomes visible.

If you want to post a file with just the hips and one leg, I'm sure one of us can give you a more exact solution.
User avatar
Greenlaw
Posts: 10466
Joined: Mon Jun 19, 2006 5:45 pm
Location: Los Angeles
Contact:

Re: Anti-Aliasing Artifacts (layer seams)

Post by Greenlaw »

Here's what I think is going on...

I often create an arm in two separate shapes so I can easily 'wrap' the arm around the torso using animated layer order. Do do this, I split the paths at the joint and create two shapes. Then, I duplicate the layer and delete the opposing shapes in each layer. This keeps the edge between the shapes perfectly aligned even when they deformed by bones.

For example...

Image

Over on the left is an 'arm' drawing drawn as two shapes in a single layer.

In the middle is the same drawing split into two layers with the lower shape deleted in the layer called Up, and the upper shape deleted in the layer called Lo. On the right is the same drawing but with one layer offset so you can see how it's structured. Here's the same scene with a red backdrop to illustrate there is no gap between the two layers in the middle example....

Image

In the workspace, the first and second drawings look identical. However when I render the project, I get this...

Image

This edge aliasing error occurs when anti-aliasing is enabled. If I rendered this same project with antialiasing disabled, the second drawing will look solid again.

To correct this, there are two approaches I can take.

If I'm fixing this in Moho...

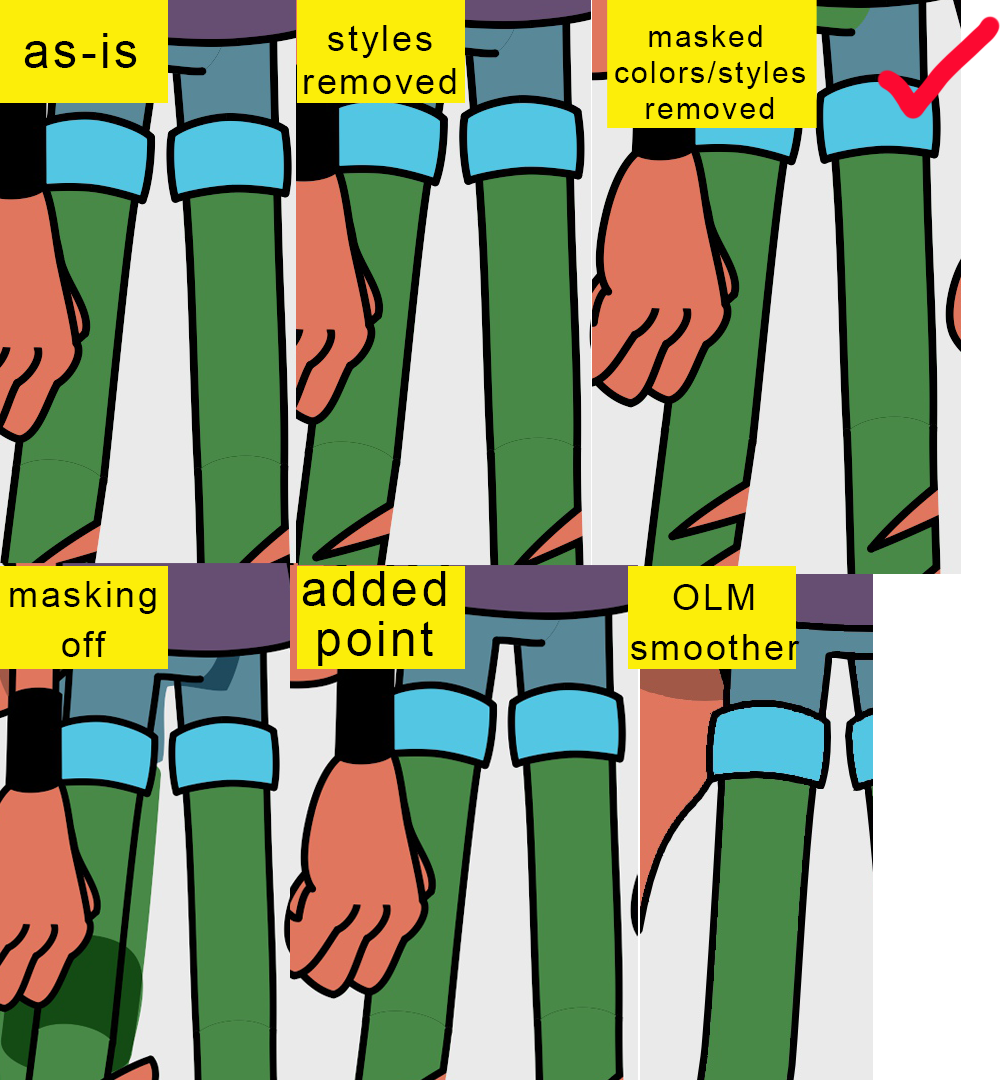
1. ...I'll add a point to the arm's line in the joint area in one of the layers, and pull it over the other shape's edge. Like so...

Image

Now when I render the project, the gap is gone...

Image

This is probably the easiest and most common way to fix this error.

To fix this in post, I do this...

2. Render the scene with antialiasing disabled. Now in my compositing program, I use a plug-in or node to apply antialiasing the aliased edges. If I'm compositing in After Effects for example, I use the free OLM_Smoother plugin, which was created specifically for applying antialiasing to raw animation renders. You can get OLM_Smoother and other free animation processing plugins here...

OLM Tools

The trick with this method is that the renders must not be anti-aliased. OLM looks for hard edges and it's not effective if the edges already have softness applied by your animation program.

We use both methods where I work. The second method is more common when I need to merge my Moho renders with Harmony renders, and I need the AA to look exactly the same for both elements in comp. Also, doing your AA in post opens possibilities not possible or not easily accomplished if your animation already has AA applied. Check out some of the other OLM plugins to see examples of what I mean.

Finally, rendering with AA disabled may speed up your renders. So if you experience long render times, adding AA as a post effect might be worth your consideration.

Hope this helps.
User avatar
lazerslab
Posts: 35
Joined: Sat Mar 26, 2022 12:55 am
Location: Cranston, RI
Contact:

Re: Anti-Aliasing Artifacts (layer seams)

Post by lazerslab »

Thank you all for your thoughtful and thorough responses. Honestly I think there's merit in all the suggestions, so hopefully Monday I intend to test them all and will report the results back. Those of you who suggested masks/shapes/layer styles are indeed correct all of those things are going on here- and Greenlaw you have effectively recreated the artifact so I assume this goes beyond just the masking. Anyway, I will test everything and see what sticks - also, Greenlaw, I checked out the OLM site and wow! Looks like they have some pretty great stuff available that I am excited to put to use! Thanks for that hookup and Thanks again everyone!
User avatar
Greenlaw
Posts: 10466
Joined: Mon Jun 19, 2006 5:45 pm
Location: Los Angeles
Contact:

Re: Anti-Aliasing Artifacts (layer seams)

Post by Greenlaw »

Cool! I hope that helps.

I should clarify that when I say the first method is 'easier', that's if want to use Moho's AA...which is probably most of the time.

The second method is easier when you have reasons to do the AA in a compositing program. This is probably more applicable on a case by case situation, or if you happen to establish this as your regular workflow.
User avatar
lazerslab
Posts: 35
Joined: Sat Mar 26, 2022 12:55 am
Location: Cranston, RI
Contact:

Re: Anti-Aliasing Artifacts (layer seams)

Post by lazerslab »

Hey everyone -

Thanks again for all the great suggestions! I rounded them up and did a side-by-side comparison. I will also kinda elaborate here in the reply:
Image
-Firstly, there's an image of the character, as-is (I made a few changes to the shape of the thigh from the previous version.
-I also included an image of the left leg with masking turned off, so you can get a sense of the shape that's being masked. It's much larger than the shape of the leg, and the colors are set to multiply. I'm doing this so I can retain the linework from the bottom (mask) layer, which I have colored white. I had a reason for the multiply setting but I honestly don't remember what it was.... This masking was mainly necessary to achieve the torn look of the leggings, as pictured.
-Daxel's suggestion of extending the mask seemed promising, however, it was grayed out the in the layer settings.
Image
-I removed styles from the masked shapes to start. I then color sampled the green. This had no effect, but not surprising, as it is beginning to look like the multiply setting is causing the issue.
-I then completely removed the masked layer altogether, and used the colors in my base layer. I'm not sure if the styles really had anything to do with it, or if it was just the fact that I got rid of the multiply setting.
-The added point also had no effect, but for rigging purposes I usually overlap the edges anyway, so edges already had a pretty healthy overlap to begin with.
-Lastly, I tried OLM smoother with AE on an aliased render of the character. I love the idea of this plugin - I use AE for comp so I'm happy to use it - The results, however, were far inferior to the rendered result with Moho's built in anti-aliasing. OLM had a ton of great other plugins though so I am still very stoked for that info!

verdict: I think in this case the issue is a combination of the multiply layer setting and the "stacked" shapes as mentioned by a few of you. While I can work around it on this rig, I think there are plenty of instances where I will need to set a layer to multiply in a mask group, so I'm curious if any of you have thoughts on reliable workarounds in the future? I for example, use multiply and masking often for shading on characters, so I can revisit old rigs as well to see if that also caused the issue. I most certainly have had the same issue that Greenlaw recreated in other rigs I've built as well, and I have assumed the cause to be the same, but I believe in this case it is different, and was a multiply issue and stacking layers.

If anyone still wanted a crack at the rig feel free to send a Private Message and I will send it over- While I feel like I know the cause now, I still don't totally understand why it's happening.
Daxel
Posts: 1088
Joined: Wed Mar 27, 2019 8:34 pm

Re: Anti-Aliasing Artifacts (layer seams)

Post by Daxel »

lazerslab wrote: Tue Jun 14, 2022 4:39 am
-Daxel's suggestion of extending the mask seemed promising, however, it was grayed out the in the layer settings.


That setting, as the other "layer masking" settings are availible for the layers inside the mask group, not the group layer itself. You could try to apply it on the layer that is acting as the mask, that has that plus (+) icon and its mask settings say ·Add to the mask.

If you weren't familiar with these settings, exclude strokes is another useful one, it could help you to retain the stroke of the leg on the part where the pants are scraped, if you want.
User avatar
lazerslab
Posts: 35
Joined: Sat Mar 26, 2022 12:55 am
Location: Cranston, RI
Contact:

Re: Anti-Aliasing Artifacts (layer seams)

Post by lazerslab »

exclude strokes is another useful one, it could help you to retain the stroke of the leg on the part where the pants are scraped, if you want.
HOLY MOLY - My mind is blown! That's probably gonna solve a lot of problems for me! THANK YOU!

I will also attempt expanding the mask on the individual layer and see if that has an effect. In retrospect, it seems so obvious that it wouldn't work on the group, I feel kinda silly. whoops-
User avatar
Greenlaw
Posts: 10466
Joined: Mon Jun 19, 2006 5:45 pm
Location: Los Angeles
Contact:

Re: Anti-Aliasing Artifacts (layer seams)

Post by Greenlaw »

BTW, your character is pretty cool!
User avatar
lazerslab
Posts: 35
Joined: Sat Mar 26, 2022 12:55 am
Location: Cranston, RI
Contact:

Re: Anti-Aliasing Artifacts (layer seams)

Post by lazerslab »

BTW, your character is pretty cool!
Thanks Greenlaw! I actually used MQC while rigging her so I owe you one for that!
You could try to apply it on the layer that is acting as the mask,
Daxel, I applied the expand mask by one pixel, which increased the line, so I think at the very least that solves the mystery incontestably for me- Now I just gotta get them to add a contract by one pixel button! Come to think of it, it's a feature I used to use pretty regularly in photoshop so it probably would have some value!

Image
exclude strokes is another useful one, it could help you to retain the stroke of the leg on the part where the pants are scraped, if you want.
Wow - This little tip is something I would have never realized left to my own devices, but it's so so helpful for my particular workflow- thank you. This alone will no doubt save me from the anti-aliasing issues a bunch in the future - Cheers!

Image
User avatar
synthsin75
Posts: 10280
Joined: Mon Jan 14, 2008 11:20 pm
Location: Oklahoma
Contact:

Re: Anti-Aliasing Artifacts (layer seams)

Post by synthsin75 »

Again, if you want to share a file of one of the legs, I'm sure we can solve the seam.
Post Reply