Points and bones wont work with Imported drawing

Wondering how to accomplish a certain animation task? Ask here.

Moderators: Víctor Paredes, Belgarath, slowtiger

Post Reply
peteruk56
Posts: 4
Joined: Tue Oct 24, 2006 2:21 am
Location: UK
Contact:

Points and bones wont work with Imported drawing

Post by peteruk56 »

I am new to all this automatic movement in animation. I have just purchased the basic version of Anime Studio 5, and I am having problems getting Bones and Binding Points to adhere to an ‘Imported’ drawing.

The samples given for you to work on in Tutorials already have Binding Points on and all you have to do is insert the bones and all works fine, it’s just with an ‘imported image’ that I can’t get it to work.

I have tried both the manual and auto Binding.

Any advice would be helpful. Thank you!


Image
myles
Posts: 821
Joined: Sat Aug 21, 2004 3:32 am
Location: Australia, Victoria, Morwell
Contact:

Post by myles »

Hello Peter,

it looks like you are trying to use points to morph your scanned image, a technique used by some image morphing programs.
Anime Studio is not a morphing program. The points do not affect your image or scanned artwork in any way whatsoever - they are not "binding points" like in a morphing program. Points never work with an imported drawing.

Anime Studio is an animation program, and you can animate in two ways (well, a lot more than that, but let's start with the basics).

1. You can use the points to draw complete closed shapes (like Adobe Illustrator, CorelDRAW, Xara Xtreme, Microsoft Expression Graphic Designer, or similar vector/spline-based programs), then use bones to animate those shapes. This does not involve any scanned artwork. Do Tutorial 1.2 and 1.3 to get a quick idea of how to draw with points, then all the 2.x tutorials for further details. This is how Anime Studio was originally designed to work, and the documentation covers this very well.

2. You can draw your characters in a paint program or scan in hand-drawn artwork, as you are trying to do. This is becoming a popular way to use Anime Studio, but the documentation doesn't cover this in as much detail - many of the needed details are still found in the vector/spline drawing tutorials. You do not use points at all for this style of animation.

If you do this, you need to do a bit more work and cut your character into pieces in a separate program (Photoshop, Artweaver, etc) before importing the separate pieces into Anime Studio. Use .png images with transparent backgrounds for each piece of your character. The pieces can then be manipulated by bones like shadow puppets. Tutorial 4.1 is a simple example of this - you need to position and bind each piece to a bone. You can also warp a single image (see Tutorials 4.2 and 4.3), but it's not very effective.

See these tutorials by Ibis Fernandez on creating "Bopsey models" for Flash: Creating and using 2D models and Animating with Bopsey models.
You need to do exactly the same thing with your scanned artwork for use in Anime Studio, but Anime Studio uses bones where Flash uses pivot points.
For example, see this sample character (scroll down to the bottom) which is provided already cut up into pieces (although it is set up for Flash rather than Anime Studio) from Cartoon Solutions.

If you are using Windows XP, open C:\Program Files\e frontier\Anime Studio\Library\Anime Characters\Winsor_Front_images in Windows Explorer (not Internet Explorer), and change the view to Thumbnails view to see the sort of images used in an Anime Studio character already cut up and ready to import and animate in Anime Studio.

Regards, Myles.
"Quote me as saying I was mis-quoted."
-- Groucho Marx
peteruk56
Posts: 4
Joined: Tue Oct 24, 2006 2:21 am
Location: UK
Contact:

Thanks for help but new problem has arrisen.

Post by peteruk56 »

Hi Myles!

I followed your instructions and now I can get the Bones to adhere to the toon and it moves very well. THANK YOU!

HOWEVER! A new problem has arisen from this. I separated one arm from the body as a test to try it out and although both parts worked fine alone, I could NOT get them to join up and in fact the white background from one would obscure the other. (See pic)

I did save them as PNG images with transparency. I tried it in Paint Shop Pro4 which is an older version. Also Adobe Photoshop Elements which gave me 2 choices to save PNG. One was PNG-8 or PNG-24. I also tried saving in PNG straight as Save As… Also tried saving as Save for Web. But always with Transparency ticked

I have spent hours trying different ways and I am about to give up and go back to using Artoonix.

All I am trying to achieve is have one figure raise and lower an arm holding a coat.

Any help appreciated.

Peter
Image
myles
Posts: 821
Joined: Sat Aug 21, 2004 3:32 am
Location: Australia, Victoria, Morwell
Contact:

Re: Thanks for help but new problem has arrisen.

Post by myles »

Hi Peter,
peteruk56 wrote:I could NOT get them to join up
The arm bone needs to be a child of the torso bone. Either select Image the torso bone before drawing Image the arm bone, or select Image the arm bone, choose the Reparent Bone tool (shortcut P) Image, then click on the torso bone.
peteruk56 wrote:and in fact the white background from one would obscure the other. (See pic)
Hmm, somehow the image is not saved with transparency - the white background areas should be invisible in Anime Studio, and should probably show as a light grey checkerboard in your image manipulation software.

If you're using Adobe Photoshop Elements use PNG-24 with Transparency for export (or PNG-32 if it's available, which is basically the same thing).

What sometimes happens is that many image manipulation programs import/open your image as the background layer, and don't allow you to really manipulate transparency in the background layer.

I don't use either of those programs at the moment, so these instructions will be fairly generic.

See if you can duplicate/promote/copy the image layer (so that it is no longer the "background" layer), make sure transparency is unlocked for that layer, hide any remaining background layer (often a closed eye icon), and now you need to erase the white areas.

When you erase the background you should see a light grey checkerboard pattern in most image manipulation programs. If the eraser is only showing white, it is only "erasing" (actually painting) to the white background colour, not creating transparent areas.

As an alternative to using the eraser, try selecting some of the white areas and hitting the Delete key to see if the checkerboard background appears.

You should be seeing something like this (screenshot from the freeware Artweaver program) before you export/save from PaintShop Pro or Photoshop Elements (well, without the bones, of course):

Image

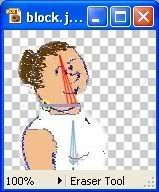
The exact size and colours of the checkerboard background will vary considerably between programs.

If you aren't seeing the checkerboard, there's a good chance you probably don't have any real transparency to export/save in the first place.

Regards, Myles.
"Quote me as saying I was mis-quoted."
-- Groucho Marx
Post Reply