
How can I manage my scenes?Is there something like scene manager in AS?
Scenes
Moderators: Víctor Paredes, Belgarath, slowtiger
Scenes
Hi there 
How can I manage my scenes?Is there something like scene manager in AS?
How can I manage my scenes?Is there something like scene manager in AS?
Just wanted to make my working area simpler.
Actually I'd prefer exporting each scene to a movie file and connecting them using a movie editng software.
Thanks for the answer anyway.
Actually I'd prefer exporting each scene to a movie file and connecting them using a movie editng software.
Thanks for the answer anyway.
Last edited by CGArtFan on Tue Jul 26, 2011 6:00 am, edited 1 time in total.

-
hayasidist

- Posts: 4002
- Joined: Wed Feb 16, 2011 11:12 am
- Location: Kent, England
also render times can be long, and the output file sizes huge (I output uncompressed AVI for input to compositing software) if you make sequences too long.
As far as I'm concerned small is beautiful ... rarely more than 15 secs - and that often gets merged (or chopped up and interspersed) with other output.
As far as I'm concerned small is beautiful ... rarely more than 15 secs - and that often gets merged (or chopped up and interspersed) with other output.
I usualy have a lot of elements in one project, like 2-3 fully created characters, backgrounds (which contain multiple layers) and other stuff like particles or images that are hidden so they can appear at a specific time and a lot of sounds (8-11 files).
For rendering I chose quicktime and the compression type Animation and it works perfect for my ~1 min. videos.
I found those settings to work the best and and the file size is good.
For rendering I chose quicktime and the compression type Animation and it works perfect for my ~1 min. videos.
I found those settings to work the best and and the file size is good.

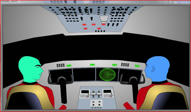
I'm building a scene where I will switch from what the image shows to a speaking character or a hand then maybe zoom through the windshield out into a space scene. I want to do this with the tracking camera. I see this as one scene since it is one file. I will composite this to an exported video of a space scene so I can create a sense that the spaceship is flying past things.
I would like to know if it is possible to add as second scene by using the sequencer to slide a new file to the end of an exported video and re-exporting the whole thing?
I would like to know if it is possible to add as second scene by using the sequencer to slide a new file to the end of an exported video and re-exporting the whole thing?
Cheers, Larry
-
hayasidist
- Posts: 4002
- Joined: Wed Feb 16, 2011 11:12 am
- Location: Kent, England
I've just done a "space" vid almost exactly as you say:
(yeah - I know the drawing and animation and camera work and ... and .. needs to be improved .. but hey - I'm still on the learning curve... )
http://www.youtube.com/watch?v=GHnPfl42jes
For scenes that are essentailly the same apart from camera movement I use the same .anme just changing camera animation and rendering out for as many times as I changed camera pos. I "saved" the camera motion by -- yes -- pencil and paper.
Where I wanted to add video effects from my compositor to the (e.g.) bg stars, I rendered the same .anme twice - one with just the bg and once with the fg action to create two files that were perfectly sync'd.
I used z for depth / relative motion - e.g. ship at z=0; to do the flythrough into the ship the "windscreen" was at a z=.5; the stars at z = -650 and to simulate motion in the z direction I used both camera movement and layer movement.
the whole was 12 .anme files rendered to over 40 .avi plus live action ..
-
hayasidist
- Posts: 4002
- Joined: Wed Feb 16, 2011 11:12 am
- Location: Kent, England
Hi,
the planet turn was done like this:

the .pngs were created in photoshop.
Clouds .. is just as it says - pale blue fg white bg -- filter / render / clouds in PS; then at opacity 70% in AS - big enough to fill beyond the camera area.
Earth is similarly trace and fill (in photoshop). It's a Mercator projection of the whole planet from Dateline to Dateline with Greenwich meridian central.
The layer translation of Night does not need to match that of Map - depends on how fast you are orbiting (or not!).
Rotation of the planet is by moving the parent bone (this drags the image past the mask, distorting the polar region). I didn't try to do more than one rotation, but the principle is as with any such loop: the start and end points have to identical -- so here I'd have extended the image left and right to be (say) from Japan through dateline to greenwich past Japan again to dateline to US West Coast. Starting portion would then be the rightmost Japan-US West Coast; ending is the leftmost Japan-US West Coast; then step change layer position back to rightmost -- movement would need to use Linear interpolation... (lots of other threads explain this motion loop in more detail / better than I can.)
If you'd like the .anme (ASP7) just say.
the planet turn was done like this:
the .pngs were created in photoshop.
Clouds .. is just as it says - pale blue fg white bg -- filter / render / clouds in PS; then at opacity 70% in AS - big enough to fill beyond the camera area.
Earth is similarly trace and fill (in photoshop). It's a Mercator projection of the whole planet from Dateline to Dateline with Greenwich meridian central.
The layer translation of Night does not need to match that of Map - depends on how fast you are orbiting (or not!).
Rotation of the planet is by moving the parent bone (this drags the image past the mask, distorting the polar region). I didn't try to do more than one rotation, but the principle is as with any such loop: the start and end points have to identical -- so here I'd have extended the image left and right to be (say) from Japan through dateline to greenwich past Japan again to dateline to US West Coast. Starting portion would then be the rightmost Japan-US West Coast; ending is the leftmost Japan-US West Coast; then step change layer position back to rightmost -- movement would need to use Linear interpolation... (lots of other threads explain this motion loop in more detail / better than I can.)
If you'd like the .anme (ASP7) just say.
-
hayasidist
- Posts: 4002
- Joined: Wed Feb 16, 2011 11:12 am
- Location: Kent, England
the walk away from camera was done like this:
reference points for the heels created (in this case) from real word stills images - lock off the camera - photograph the virgin sand a few times over the next few mins. (Plus hope the dog / seagull / camel / ... doesn't trample the scene). Create the footprints by me walking away from camera until the practical "infinity" as far as converging tramlines are concerened (10 metres). jump outside the tramlines (not a long way to go!), walk back to camera out of frame as far as poss, then take another pic. (or 2 or 3 or .. over the next few mins to allow for subtle, but evident light changes.) Choose the best matched pair of "before and after" and finish the lighting / tidying tweaking in photoshop. Measure pace intervals to determine a "close enough" linear scale change from starting to ending position (yes I know theory says it ain't linear, but within the range I'm using linear is good enough!)
for the film - 4 (groups of) layers in AS (from the top): the walker; trodden sand; reveal mask; virgin sand. Expand the reveal mask (Step interpolation) along the trodden path sync'd to pace. try (and nearly suceed! ) to keep the walker's heels locked to those ref points as necessary in the walk cycle whilst:
- linear interpolation to decrease the layer scale of character
- linear motion of the character layer along the line being walked
- bone length increases to compensate for scale reduction that would not occur to the trailing limb until ....
- the limb travels past the body (and thus needs to become visibly smaller) when I decrease bone length
- camera track and zoom are only to give me the framing that I want.
(I didn't use z motion for the character, nor image rotation around the x axis for the footprints because I used live images)
Walk towards cam is the same but to increase the character's visible size (yep - again could've used z but didn't!)
plenty of room for improvement, but that's what the process of learning and gaining experience is all about. ... principles AND practice.
reference points for the heels created (in this case) from real word stills images - lock off the camera - photograph the virgin sand a few times over the next few mins. (Plus hope the dog / seagull / camel / ... doesn't trample the scene). Create the footprints by me walking away from camera until the practical "infinity" as far as converging tramlines are concerened (10 metres). jump outside the tramlines (not a long way to go!), walk back to camera out of frame as far as poss, then take another pic. (or 2 or 3 or .. over the next few mins to allow for subtle, but evident light changes.) Choose the best matched pair of "before and after" and finish the lighting / tidying tweaking in photoshop. Measure pace intervals to determine a "close enough" linear scale change from starting to ending position (yes I know theory says it ain't linear, but within the range I'm using linear is good enough!)
for the film - 4 (groups of) layers in AS (from the top): the walker; trodden sand; reveal mask; virgin sand. Expand the reveal mask (Step interpolation) along the trodden path sync'd to pace. try (and nearly suceed!
- linear interpolation to decrease the layer scale of character
- linear motion of the character layer along the line being walked
- bone length increases to compensate for scale reduction that would not occur to the trailing limb until ....
- the limb travels past the body (and thus needs to become visibly smaller) when I decrease bone length
- camera track and zoom are only to give me the framing that I want.
(I didn't use z motion for the character, nor image rotation around the x axis for the footprints because I used live images)
Walk towards cam is the same but to increase the character's visible size (yep - again could've used z but didn't!)
plenty of room for improvement, but that's what the process of learning and gaining experience is all about. ... principles AND practice.
You could also make a half circle line and make it 3D lathe and add an image texture to the vector line and rotate it on Y axis 360 cycle back to 1.3deeguy wrote:@hayasidist, Thank you! In my next video I should now be able to make an alien planet appear to rotate.
You mentioned the Z-axis which I recently discovered is a powerful feature of AS. It is why I wanted to make a 'space' animation.
ASP rocks.


-
hayasidist
- Posts: 4002
- Joined: Wed Feb 16, 2011 11:12 am
- Location: Kent, England
hey hey - life is a learning experience!
I've just tried a semicircle, no line, texture fill, do not tile, adjust the texture handles to fit the image neatly pole to pole. then an animated horizontal shift of the handle does the rotation.
My image doesn't line up well at the "dateline" (mea culpa), but with masking and shadows the effect is .. well .. what can I say but thanks sbtamu. another eye-opener...
here's the result. http://www.mediafire.com/?q98bgw5uyuav469